
Why a Garage Gym Beats a Commercial Gym
The math on a garage gym is compelling. The average gym membership costs $40–$80 per month — $480–$960 per year. A well-equipped garage gym costs $2,000–$8,000 and serves you for 10–20 years. At mid-range costs, it pays for itself in 3–6 years and saves $8,000–$15,000 over its lifetime.
Beyond the economics: a garage gym has no commute, no waiting for equipment, no monthly fees, and no social anxiety. You train when you want, how you want, with the music you choose.
As a mechanical engineer, I've approached garage gym design the same way I approach any mechanical system: understand the loads, specify the right components, design for function first. This guide reflects that approach.
In This Guide
Step 1: Define Your Training Style
Your equipment choices should match how you actually train — not how you think you might train someday.
| Training Style | Primary Equipment | Minimum Space |
|---|---|---|
| Powerlifting (squat/bench/deadlift) | Power rack, barbell, plates | 10×10 ft minimum |
| Olympic weightlifting | Platform, bumper plates, barbell | 12×12 ft minimum |
| Functional fitness / CrossFit | Rig, pull-up bar, kettlebells, rower | 15×15 ft ideal |
| Bodybuilding / hypertrophy | Cable machine or adjustable dumbbells, bench | 8×10 ft possible |
| Cardio / general fitness | Treadmill or bike, some weights | 10×12 ft |
| Yoga / mobility | Clear floor space, mat, accessories | 8×10 ft minimum |
Be honest. If you've never done Olympic lifting at a gym, buying a platform and bumper plates for your garage gym is aspirational budgeting. Buy for how you train now.
The Real Cost Savings: Garage Gym vs Membership
The math that convinces partners and justifies the investment:
| Gym Investment | Membership Replaced | Breakeven | 10-Year Savings |
|---|---|---|---|
| $1,500 | $40/month | 37 months (3.1 years) | $3,300 |
| $3,000 | $60/month | 50 months (4.2 years) | $4,200 |
| $5,000 | $80/month | 62 months (5.2 years) | $4,600 |
| $8,000 | $80/month | 100 months (8.3 years) | $1,600 |
What this doesn't capture: No fuel or commute time (avg 20 min/trip × 4 trips/week = 70+ hours/year). No waiting for equipment. No annual membership price increases (gym fees typically rise 5–10% per year). Equipment holds resale value — a quality power rack or barbell set sells for 50–70% of purchase price on the secondhand market.
Use the AI Garage Designer to get a personalised gym layout based on your specific space and training goals.
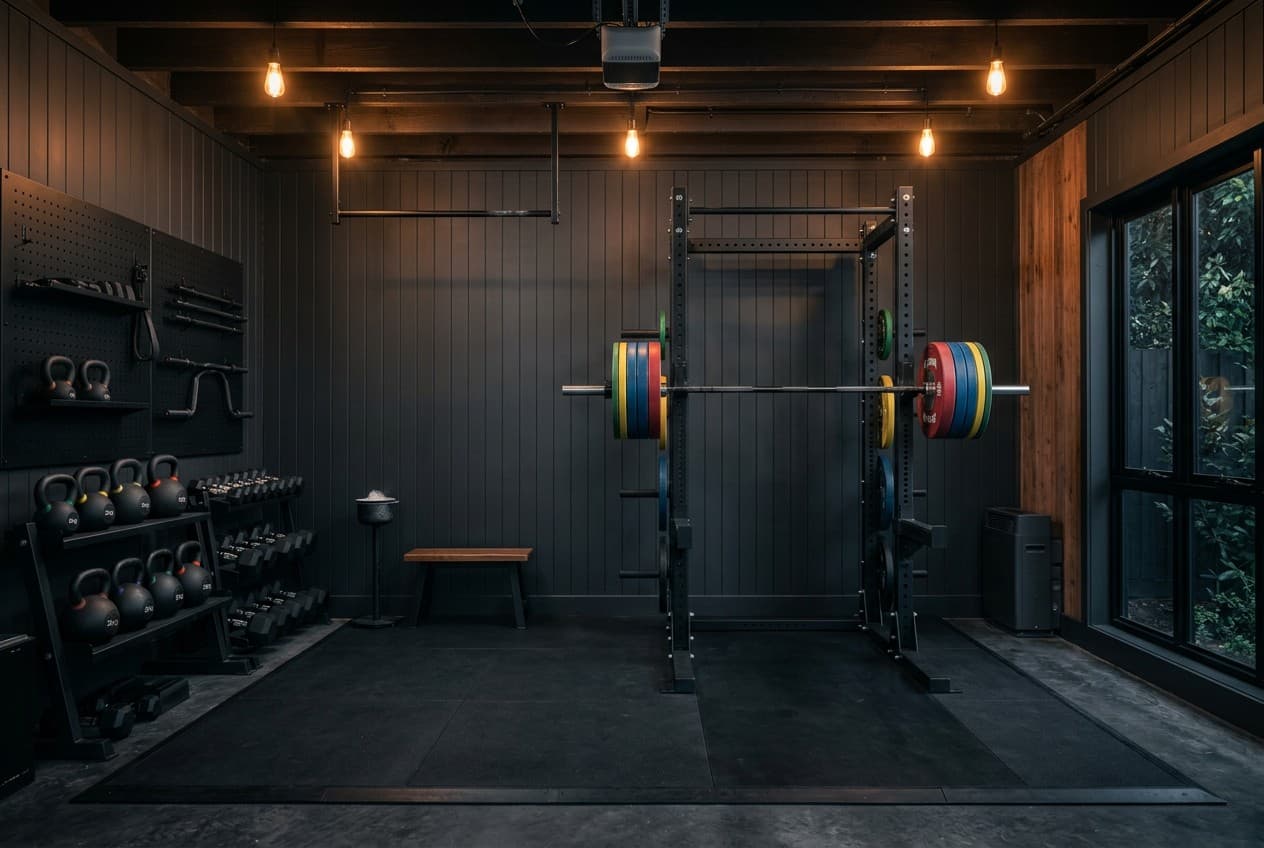
Step 2: Flooring — The Non-Negotiable Foundation
Gym flooring is the single most important purchase in a garage gym. Get this right and everything else works better.
Why You Can't Skip Proper Flooring
Concrete is too hard and too unforgiving. Dropped weights can crack concrete or damage equipment. Jumping, running, or heavy barbell work without proper flooring is a joint abuse situation. Noise transfer to the house is significant without dampening.
Rubber Flooring — The Standard
3/4-inch thick rubber horse stall mats from agricultural suppliers are the gold standard garage gym floor. They're cheaper than purpose-marketed gym tiles, equally effective, and available in 4×6 ft sections.
- Cost: $1.50–$2.50/sq ft (dramatic savings over purpose-branded gym tiles)
- Coverage: Six mats (24 sq ft each) cover a 12×12 area
- Weight: Each mat weighs ~100 lbs — have help available for installation
For the full floor of a 2-car garage (400 sq ft), expect $600–$1,000 in stall mats.
Purpose-built gym tiles: If you prefer an interlocking tile system with more colour options:
- Rubber Gym Tiles 3/4-inch — major suppliers have 4×6 options and tile options
- Greatmats, RubberFlooringInc, and Horse.com are reliable sources for stall mats by the pallet
For deadlift platforms: Consider a dedicated lifting platform — rubber mat topped with wood platform topped with rubber track — for Olympic lifting or heavy deadlifts. This protects the floor, the barbell, and your concrete.
Step 3: Equipment by Budget
$500 Budget — Minimal Viable Gym
This gets you training today:
- Adjustable dumbbell set (5–50 lb range) — Amazon Adjustable Dumbbells
- Pull-up bar (doorway or wall-mounted)
- Resistance bands
- Yoga mat
- Jump rope
This setup covers upper body, core, and cardio. Limitations: no heavy lower body work, no barbell training.
$1,500 Budget — The Foundation Gym
- Adjustable dumbbells (5–70 lb range)
- Flat/incline adjustable weight bench
- Pull-up / dip station (freestanding)
- Barbell + 200 lb Olympic plate set
- Resistance bands
- Rubber flooring (partial coverage, key areas)
You can now train all major movement patterns: push, pull, squat, hinge, carry. This is a complete training setup for most fitness goals.
$3,000 Budget — The Capable Gym
Add to the $1,500 foundation:
- Power rack (squat rack with safety bars) — the anchor of any serious lifting gym
- Additional plates (up to 400–500 lb total)
- Rubber flooring — full coverage
- Cardio equipment: fan bike, rower, or compact treadmill
Power rack recommendation: Rogue RML-490C Power Rack is the aspirational choice; Titan T-2 Series gives 80% of the functionality at half the price.
$5,000–$8,000 Budget — The Full Build
Add to the $3,000 setup:
- Cable machine or functional trainer (the biggest gap in most home gyms)
- GHD or Nordic curl bench for posterior chain
- Plyo boxes
- Full wall mirror(s)
- Better cardio machine (commercial-grade rower, assault bike, or treadmill)
- Ceiling fan and dedicated lighting
- Insulation and climate control basics
Cable machine options:
- REP Fitness FT-100 Functional Trainer — excellent value
- Force USA G20 All-in-One Trainer — comprehensive if space allows
Step 4: Layout Planning
Space Requirements
| Equipment | Minimum Footprint | Safety Zone |
|---|---|---|
| Power rack | 4×4 ft | 2 ft behind, 3 ft front |
| Flat bench | 2×5 ft | 2 ft all sides |
| Treadmill | 3×7 ft | 4 ft rear |
| Rowing machine | 3×8 ft | 2 ft front |
| Cable machine | 3×4 ft | 3 ft front |

The universal mistake: Buying equipment before confirming it fits with all safety zones in place. Measure your space. Add up all equipment footprints plus safety zones. Add circulation pathways (minimum 36 inches). If it doesn't work on paper, it won't work in the garage.
Ceiling Height: What You Can and Can't Do
Most garage ceilings are 8–9 ft. This determines which exercises are possible:
| Exercise | Min Ceiling Height | Notes |
|---|---|---|
| Bench press, squats, deadlifts | 8 ft | No overhead clearance needed |
| Standing overhead press | 8.5 ft+ | With bar overhead, most people reach 7.5–8 ft |
| Pull-ups (hanging from bar) | 8.5 ft+ | Bar at 7.5 ft; bend knees if needed |
| Kipping pull-ups / muscle-ups | 10 ft+ | Requires swing clearance |
| Olympic lifts (snatch, clean & jerk) | 10 ft+ | Bar goes well overhead; 9 ft is tight |
| Jump rope | 10 ft+ | Rope arc adds 12–18 in above head |
| Box jumps (24–30" box) | 9 ft+ | Consider head clearance at top of jump |
If your ceiling is 8 ft: You can run a complete strength programme (squat, bench, deadlift, rows, seated press). Skip standing overhead press (do seated or use a landmine), skip Olympic lifts, skip jump rope. This is not a dealbreaker — most training goals are fully achievable at 8 ft.
Traffic Flow
Position equipment so you can:
- Enter and exit the gym without navigating around equipment
- Move between exercises without walking through safety zones
- See yourself in the mirror from primary lifting positions
Step 5: Environmental Control
Temperature
Uncontrolled garage temperatures make training uncomfortable or impossible in extremes. Your options:
Ceiling fan: A quality ceiling fan dramatically improves perceived temperature and air circulation. Install one if you don't have one — it's the cheapest climate intervention available.
Portable AC unit: Sufficient for cooling in summer. Run it 30–60 minutes before training to pre-cool the space.
Mini-split heat pump: The right answer for a year-round serious gym. Handles both heating and cooling, runs quietly, and dramatically extends usability.
Electric radiant heater: Quick-heat option for winter. Position away from equipment and ensure adequate clearance.
Ventilation
Humidity and CO2 build up quickly during hard training. Good ventilation improves performance and equipment longevity (rubber equipment degrades faster in humid environments).
At minimum: a wall exhaust fan that pulls fresh air through the space. Broan-NuTone Exhaust Fan.
Step 6: Gym Mirrors
Mirrors serve two functions: form checking during lifts, and making a small space feel dramatically larger.
Coverage: Cover at least one full wall adjacent to the lifting area. Full-length coverage from floor to 7 feet.
Options:
- Mirror panels (12×48-inch) mounted on a track or direct to wall — most cost-effective
- Acrylic safety mirror sheets — cheaper, lighter, won't shatter if a plate hits them
- Purpose-built gym mirror kit — clean framing, easy install
For a one-car garage gym: one wall of mirrors facing the rack makes the space feel twice as large.
Large Wall Mirror Panel 48"×36" — popular choice for home gyms.
Step 7: Garage Gym Essentials You'll Forget to Buy
These small investments make a big difference to daily usability:
- Chalk bucket — magnesium carbonate chalk improves grip dramatically; keeps hands dry
- Chalk ball or liquid chalk — less mess alternative for home gyms
- Foam roller and mobility tools — warm-up and recovery
- Bluetooth speaker — a good speaker on a shelf or ceiling mount, weather-resistant
- Fan — even with AC, a floor or desk fan pointing at you during training improves performance
- Cable management — keep cords off the floor, especially near cardio equipment
- Whiteboard — for logging workouts, targets, and PR tracking on the wall
Garage Gym Flooring: Full Setup Checklist
Before you start training in your new garage gym, verify:
- Floor: full rubber coverage in all lifting and training zones
- Power rack: bolted to floor or wall per manufacturer specification
- Overhead clearance: minimum 8 feet; 10 feet preferred for Olympic lifts
- Mirror: stable and safely secured to wall
- Lighting: adequate (target 75–100 lumens/sq ft minimum)
- Emergency access: path to exit is always clear
- First aid kit: accessible and stocked
- Collar clips: on all barbells before use
Ready to Build Your Garage Gym?
Upload a photo of your garage to the AI Garage Designer and get a personalised gym setup plan with equipment recommendations matched to your space size, training style, and budget — free, in under 60 seconds.
Related guides: