
The Decision You're Actually Trying to Make
Most garage insulation guides skip straight to "measure, cut, staple" — but the real question most homeowners are staring at is: which insulation method is right for my situation, and where do I start?
The answer depends on three variables:
- Climate zone. A garage in Minnesota needs nearly twice the R-value of one in Georgia. Getting this wrong means paying for insulation that doesn't do the job, or overspending on R-value you don't need.
- Heated vs. unheated garage. If you run a mini-split or shop heater, insulating the ceiling becomes your highest-return investment. If the garage is purely for storage, a well-sealed door and insulated walls may be enough.
- DIY vs. professional installation. Fiberglass batts and rigid foam boards are legitimate DIY projects. Spray foam is not — the equipment requires training and the chemistry is unforgiving if you get it wrong.
This guide covers all three areas — walls, ceiling, and garage door — with a direct comparison of the four main insulation types, accurate cost ranges for 2026, and a practical step-by-step process for the most common DIY method.
If you want to plan your whole garage upgrade in one place, start at the garage makeover hub first.
Insulation Types Compared
| Insulation TypeRecommended | R-Value | Cost (per sq ft) | DIY-Friendly | Best For |
|---|---|---|---|---|
| Fiberglass Batts | R-11 to R-21 | $0.30–$0.60 | Yes | Walls and ceiling between studs/joists |
| Rigid Foam Board | R-3.8 to R-6.5 per inch | $0.50–$1.25 | Yes | Garage doors, basement walls, continuous coverage |
| Blown-In Cellulose | R-3.2 to R-3.8 per inch | $0.60–$1.20 (pro) | Moderate — requires blower rental | Unfinished attic/ceiling spaces, retrofit fills |
| Spray Foam (Closed-Cell) | R-6 to R-7 per inch | $2.00–$5.00 (pro) | No — professional only | Air sealing + insulation in one pass, tight spaces |
The practical upshot: for most DIYers insulating a standard 2-car garage, fiberglass batts hit the sweet spot of cost, availability, and installation simplicity. Rigid foam boards are the right call for the garage door and for any wall area where studs are already drywalled. Spray foam is worth the pro cost only if air sealing is the primary goal — most common in very cold climates or garages being converted to conditioned space.
R-Value Requirements by Climate Zone
Buying insulation without knowing your target R-value is guesswork. The US Department of Energy divides the country into climate zones 1–7. Here's what that means for your garage:
For a standard attached or detached garage in the US
How to find your zone: search "DOE climate zone map" and enter your zip code. It takes 30 seconds and removes all guesswork from your material selection.
Cost by Insulation Method
The cost spread between methods is large enough to influence which approach you choose. This chart shows estimated total material and labour cost for a standard 2-car garage (approximately 500 sq ft of wall and ceiling surface):
Garage Insulation Cost by Method — 2-Car Garage (500 sq ft)
Fiberglass batts are the lowest-cost DIY option by a meaningful margin. The gap widens if your garage has existing stud framing — you're buying batts, a utility knife, and a staple gun. No blowers, no professional crews, no cure time.
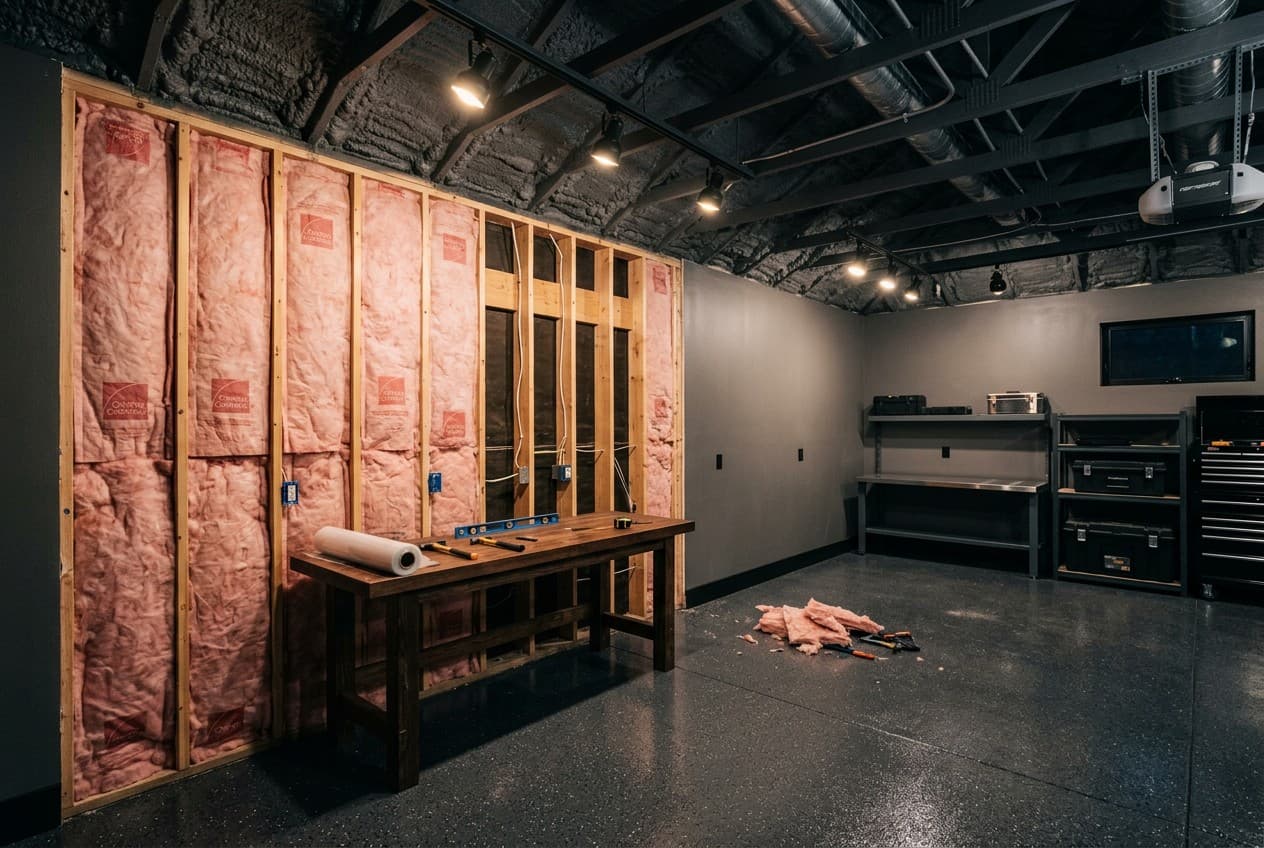
How to Insulate Garage Walls — Step by Step
This process covers fiberglass batt installation in an unfinished garage with exposed studs. It is the most common scenario for a first-time garage insulation project.
Garage Wall Insulation — Step by Step

Fiberglass Batts: Pros and Cons for DIYers
Fiberglass batts are the recommended starting point for most homeowners insulating a garage. Here is an honest assessment:
Fiberglass Batts — Is This the Right Choice?
- ✓Lowest material cost of any insulation method — $0.30–$0.60/sq ft
- ✓Available at every home improvement store in standard widths (15" and 23" for 16" and 24" O.C. stud spacing)
- ✓No special equipment needed — utility knife, staple gun, tape measure
- ✓Achievable R-value (R-13 to R-21) meets code for most US climate zones
- ✓Forgiving installation — mistakes are visible and easy to correct before drywall goes up
- ✓No cure time, no off-gassing concerns for DIY installers
- ✗Skin and respiratory irritant — full PPE required (gloves, long sleeves, N95 mask, safety glasses)
- ✗Poor air sealing on its own — air can still move through and around batts if gaps aren't foam-sealed
- ✗Does not work well in irregular or obstructed cavities — spray foam or rigid board is better in those areas
- ✗R-value degrades if compressed, wet, or improperly installed
- ✗Not suitable for garage doors — use rigid foam boards for door panel insulation
Insulating the Garage Door
The garage door deserves separate treatment because it is the largest single source of heat loss in most garages — often 40–50% of the total insulated surface area — and it requires a different material and method than the walls.
The two approaches:
1. Retrofit insulation kit ($50–$80): Pre-cut rigid foam panels sized to common door panel dimensions. You install retainer clips on the door panels, cut foam to fit, and press it in place. This adds R-4 to R-8 to an uninsulated door. It takes one afternoon, requires no adhesives, and is reversible.
2. Replacement with a factory-insulated door (R-6 to R-18): If your door is old, warped, or already damaged, replacing it with a factory-insulated door gives you a better air seal, better balanced R-value, and a cleaner result. The ROI on a new insulated door is strong in cold climates — it typically reduces energy costs enough to pay back within 3–5 years in Zone 5+.
For a retrofit kit: use rigid polyisocyanurate foam (polyiso) board if you're cutting your own panels. It delivers the highest R-value per inch (R-6.5/inch) of any rigid board product and cuts cleanly with a utility knife.
After fitting door panels, add vinyl weatherstripping to all four edges of the door frame. Check the seal by turning off garage lights and looking for daylight around the perimeter. No light should be visible.
Insulating the Garage Ceiling
The ceiling is the highest-priority surface in a heated garage. Heat rises. If your ceiling is uninsulated, you can have R-21 walls and still lose most of your heating investment straight up.
Two situations:
Finished attic or living space above: Insulate between the ceiling joists from below, using R-30 or higher batts. Access is limited to the garage interior, so install batts before hanging drywall. Use faced batts with kraft facing down (toward the garage).
Unfinished attic space above the garage ceiling: Blow in cellulose on top of the ceiling drywall from the attic side. This is the fastest way to reach R-38 or higher and doesn't require removing any existing drywall. A blower rental runs $50–$75/day at most home improvement stores, and bags of cellulose are sold alongside it.
Target R-38 minimum for the ceiling of any garage you plan to heat, regardless of climate zone. If you are in Zone 5+, R-49 is worth the marginal cost difference.
Frequently Asked Questions
Do I need a permit to insulate my garage?
In most jurisdictions, no permit is required for insulating an existing garage if you are not changing the structure. However, if you are adding drywall (required over insulation for fire protection in many codes), some municipalities require a permit. Check with your local building department before starting — the call takes five minutes and can save you from having to open up finished walls later.
What happens if I skip the vapour barrier?
In cold climates, skipping the vapour barrier allows warm interior air to reach the cold outer wall, where it condenses. Over time this creates moisture behind the drywall, promoting mould and degrading the insulation's R-value. In mild or hot-humid climates, interior vapour barriers can cause the same problem in reverse. The rule: always check local code, because the correct answer is genuinely climate-dependent.
Is spray foam worth the extra cost for a garage?
Closed-cell spray foam is the most effective insulation product per inch — and the most expensive. For a standard garage, it is hard to justify on cost alone when fiberglass batts at the right R-value deliver comparable thermal performance. The scenario where spray foam earns its cost is when air sealing is the primary goal (very leaky construction, or a garage being converted to conditioned living space), or when you have irregular framing where batts cannot fill cavities cleanly. For most standard garage insulation projects, fiberglass batts are the better value.
What to Do Next
Insulation decisions depend on your garage's dimensions, climate zone, and how you plan to use the space. Getting those inputs right before you buy materials saves you from costly corrections later.
Use the Garage Designer to map out your garage dimensions, check your climate zone, and get a tailored insulation plan alongside your overall garage layout — all in one place.
Plan Your Garage Insulation in the Garage Designer →
Insulation is usually one piece of a broader garage upgrade — the garage makeover ideas guide covers flooring, lighting, and storage projects you can sequence alongside or after insulating. If you're budgeting the full project, the garage makeover cost guide breaks down typical costs for each upgrade so you can prioritise where insulation fits in your overall spend.
If you're also insulating a shed for use as an office or studio, the shed office insulation and HVAC guide covers the same core techniques applied to a smaller structure with different framing constraints. For insulating a she-shed specifically, the she-shed insulation guide addresses the comfort and moisture management considerations that matter most for a finished interior space.