
The Problem With Most Garages
The average American garage has approximately 150 square feet of usable wall space and 400 square feet of ceiling space. Almost none of it is used.
Instead, everything is on the floor. The floor is full, so the car lives outside. You spend 10 minutes searching for anything you need. Things get lost, duplicated, or damaged. The garage has become a storage unit you pay to maintain.
The solution is not more space — it's a system that uses the space you already have. This guide shows you how to build that system, step by step.
In This Guide
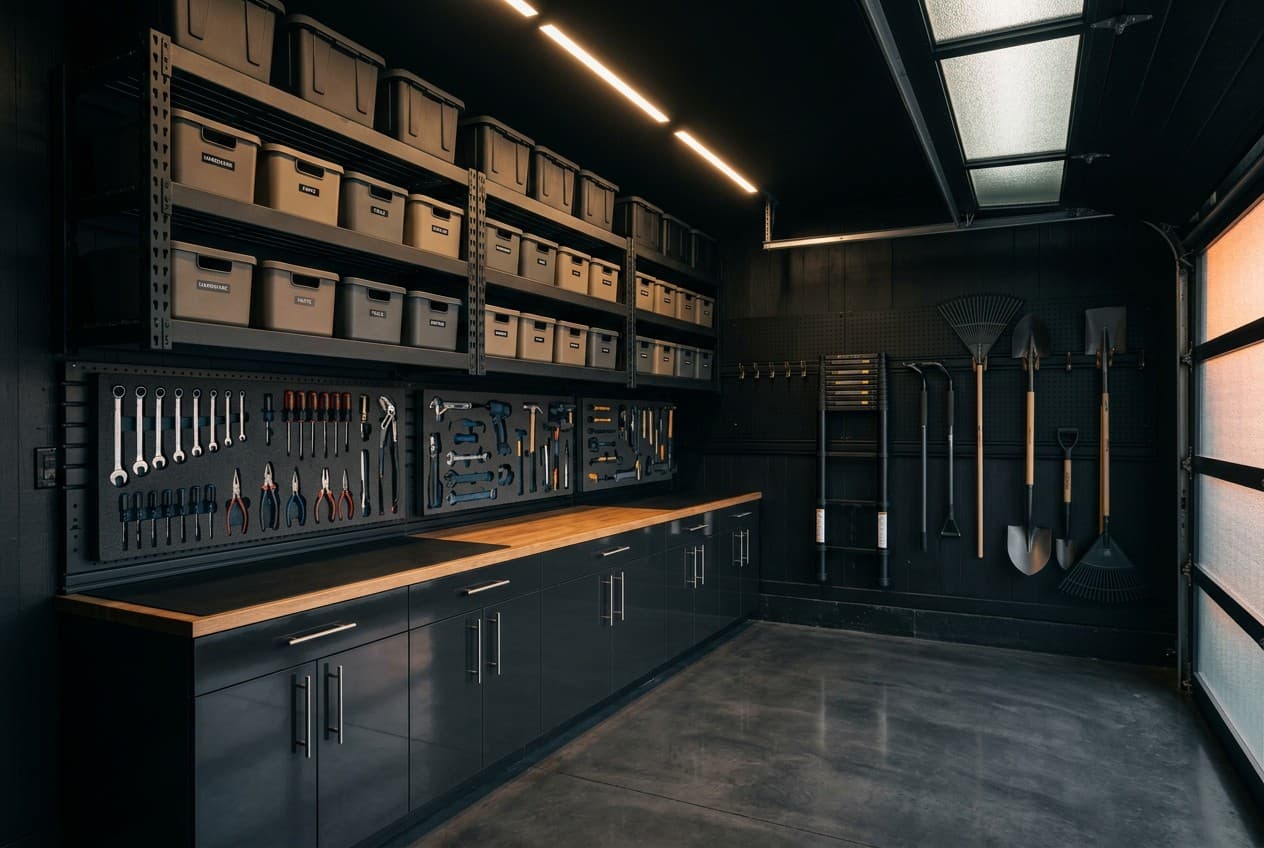
The Core Principle: Get Everything Off the Floor
The floor of your garage is the most valuable real estate you have — and storage is competing with vehicles, project work, and circulation for that space. Every item on the floor that can be moved to a wall or ceiling should be.
The garage storage hierarchy:
- Ceiling (overhead racks) — seasonal items, camping gear, holiday decorations, rarely accessed bins
- Walls (above 48 inches) — frequently accessed tools, garden equipment, sports gear
- Walls (below 48 inches) — cabinets and drawers for small items, chemicals, hand tools
- Floor — vehicles, active projects only
When you apply this hierarchy, most standard garages discover they have significantly more usable space than they thought.

Step 1: The Purge and Sort
Before installing a single storage system, you need to know what you're actually storing.
The ruthless four-category sort:
| Category | Action |
|---|---|
| Use regularly (monthly or more) | Keep — prime storage position |
| Use seasonally (2–4x per year) | Keep — overhead or back-of-garage storage |
| Haven't used in 12+ months | Donate, sell, or discard |
| Broken or beyond repair | Discard |
Most homeowners eliminate 25–40% of garage contents during this step. Every item you remove is storage space you don't need to create.
Zone your garage before installing anything: Identify where you'll park, where you'll work, and which walls serve which functions. Wall systems installed before zoning often end up in the wrong place.
Use the AI Garage Designer to get a personalised storage plan for your specific garage layout and content.
Step 2: Wall Storage Systems
How Much Weight Can Each System Hold?
Before choosing a wall system, match it to what you're actually storing:
| System | Load Capacity | Best For | Not Suitable For |
|---|---|---|---|
| Slatwall (steel panels) | 50–75 lbs per linear ft | Heavy tools, bikes, power tools | Budget builds (expensive) |
| Pegboard (1/4" hardboard) | 15–25 lbs per hook | Hand tools, small items, light organising | Heavy items, bikes, large power tools |
| French cleat (3/4" plywood) | 50–75 lbs per cleat | Workshop tools, custom holders, medium loads | Renters (permanent install) |
| Metal shelving (freestanding) | 600–3,000 lbs per unit | Heavy bins, bulk storage, automotive parts | Wall-mounted only situations |
| Overhead ceiling racks | 450–600 lbs per rack | Seasonal items, camping gear, holiday bins | Items accessed frequently |
The common mistake: Hanging a 30 lb bike on a pegboard hook rated for 20 lbs. Always check the per-hook or per-accessory rating, not just the system's total rating — a slatwall panel may hold 200 lbs total, but each individual hook has its own limit.
Option 1: Slatwall Panels
Slatwall is a grooved panel system that accepts a vast range of hooks, bins, baskets, and shelves — all rearrangeable without tools or additional hardware.
Pros: Completely modular, infinite reconfiguration, clean look, handles almost any storage need Cons: More expensive than basic shelving; some cheaper brands have weak groove strength
The best slatwall systems:
- Gladiator GarageWorks — heavy-duty steel slat wall, excellent build quality, wide accessory range. Gladiator Slatwall Panel 48"
- Flow Wall — lighter duty, attractive design, suitable for most residential garages. Flow Wall 4-Panel Garage Storage System
What to buy: Panels + a starter accessory kit. Add specific hooks and bins as you discover you need them.
Option 2: French Cleat Systems
A french cleat is a wall-mounted board with a 45° cut along one edge. Items hang on the cleat via matching 45° cut holders. It's infinitely customisable, cheap to build, and can be done with a table saw or circular saw and common lumber.
Why workshops love french cleats:
- Build custom holders for any tool, in any configuration
- Reposition anything instantly without tools
- Total wall coverage cost: $50–$150 in materials vs. $500+ for a commercial system
Best for: Workshops, tool storage, any application where you want total customisation.
French Cleat Tool Holder Kit — pre-made accessories if you don't want to build your own.
Option 3: Fixed Shelving
Heavy-duty metal shelving units work best for large, heavy, or bulky items that don't need to be at a specific height.
For garage shelving:
- Wire shelving (chrome or epoxy-coated) — good visibility, easy to clean, not the strongest
- Heavy-duty metal boltless shelving — the most load-bearing per dollar
Edsal Heavy Duty Steel Shelving Unit — 78"×48"×18" models are a popular choice, rated to 4,000 lbs per unit.
Wall anchoring: Any shelving holding significant weight should be anchored to wall studs, not just resting on the floor. A freestanding unit in a garage can tip.
Option 4: Pegboard
The classic garage wall system. Pegboard (1/4-inch hardboard with holes on 1-inch centres) accepts a wide range of hooks and holders.
Pegboard's strengths:
- Very cheap — $20–$40 per 4×8 sheet
- Works for hand tools, small power tools, small parts storage
- Visible storage means you can see at a glance what you have
Pegboard's weaknesses:
- Less load capacity than slatwall for heavy items
- Standard hooks fall out easily — look for locking pegboard hooks
ORSETTI 100-Piece Pegboard Hook Set — locking hooks make a dramatic difference.
Step 3: Overhead Storage
The ceiling of a standard 2-car garage represents 400 square feet of storage potential. Overhead racks are the highest-ROI storage addition in most garage makeovers.
Overhead Storage Racks
Fleximounts is the dominant brand in this category for good reason — their racks are well-engineered, rated to 450–600 lbs, adjustable in height, and reasonably priced.
- Fleximounts 4×8 Overhead Garage Storage Rack — most popular size
- Fleximounts 4×6 Overhead Rack — for smaller garages or partial coverage
Installation notes:
- Mount to ceiling joists — never drywall anchors alone for a loaded overhead rack
- Maintain 24-inch minimum clearance above car roofs
- Load evenly across the rack for maximum rated capacity
- Verify your ceiling joist direction and spacing before purchasing
What goes overhead: Seasonal items (holiday decorations, camping gear, skiing equipment), rarely used tools and equipment, spare building materials (lumber rack above vehicles).
Ceiling-Mounted Bike Hoists
If bikes are eating floor space, ceiling-mounted bike storage is the fix.
- Vertical hoists lift bikes to the ceiling out of the way — Racor Ceiling-Mount Bike Lift
- Horizontal wall/ceiling mounts — good for lower ceilings where vertical lift won't clear
Four bikes on a 2-car garage ceiling is achievable, which recovers significant floor space.
Step 4: Cabinets
Cabinets provide concealed storage — important for chemical products, automotive supplies, and anything you want to lock away.
Steel Garage Cabinets
Husky (Home Depot exclusive): The most popular choice for the value-conscious homeowner. Good build quality, available in 18-inch, 27-inch, and 52-inch widths. The modular cabinet systems allow you to configure a full wall.
Gladiator Premier Series: A step up in quality. Heavier gauge steel, better drawer slides, full-extension drawers. The modular systems look excellent in a finished garage.
Kobalt (Lowe's): Comparable to Husky in quality and price. Choose based on which store you prefer for service and delivery.
For a workshop configuration: Combine a 52-inch rolling tool chest (for hand tools) with a wall-mounted cabinet section (for chemicals, power tool accessories, and bulk storage) and an overhead wall cabinet (for seasonal items).
Plastic Storage Cabinets
For lighter-duty storage, polypropylene cabinets are lightweight, rust-proof, and completely unaffected by moisture — a significant advantage in garages prone to humidity.
Keter XL High Plastic Cabinet — popular for garden tools and outdoor equipment.
Step 5: Sport and Activity Storage
Sports equipment is the most space-inefficient category in most garages. Purpose-designed storage pays dividends here.
General Sports Storage
A freestanding sports tower organises balls, helmets, rackets, and smaller gear in one compact unit:
Specific Equipment Solutions
Bike storage:
- Floor stand for 2 bikes: easiest solution if floor space allows
- Wall-mount hook: vertical storage per bike, saves most space
- Ceiling hoist: best for rarely moved bikes (see above)
Ladder storage:
- Wall-mounted ladder brackets keep ladders flat against the wall
- Overhead storage is safest for longer extension ladders
Garden tools:
- Wall-mounted tool holders for long-handled tools (rakes, shovels, brooms) are far better than leaning them against walls where they fall
- Eeieeio Garden Tool Organiser
Step 6: How to Organise Small Parts and Hardware
Hardware sprawl (loose screws, bolts, anchors, odds and ends) is its own problem category. Three approaches:
Clear Bin Systems
Clear plastic bins in a consistent size stacked on shelving. Label everything. The visibility of clear bins and the uniformity of matching sizes makes this system work — don't mix bin sizes.
Akro-Mils 64-Compartment Small Parts Organiser — the benchmark in this category.
Drawer Cabinet Systems
Metal or plastic multi-drawer cabinet units for sorting small parts by type. One drawer per category (drywall screws, wood screws, nuts, bolts, cable staples, etc.).
Jar Wall
A low-cost classic: screw jar lids to the underside of a shelf, fill jars with hardware, screw them onto the lids. Visible, accessible, uses dead space under shelving. Works beautifully in a workshop.
DIY Wooden Parts Box
For small-parts storage with more capacity than jars, a simple wooden box with a hinged lid and divider tray is an excellent first workshop project that produces something genuinely useful. Build the body from 1/2-inch pine or plywood — four sides, a base, and a fitted lid. Add internal dividers to create compartments sized for your hardware (screws, bolts, anchors, cable clips). Line compartments with felt if storing metal parts that scratch. The box teaches measuring, cutting, and basic joinery while solving a real storage problem. Oak and cherry produce a handsome result; pine is fast and cheap. See the Workshop Hand Tools Guide for the hand tools you need before your first project.
Step 7: Finishing Touches
Floor Markings
Painted or taped lines on the floor define vehicle parking zones, tool storage footprints, and clear pathways. This simple step prevents things from creeping back onto the floor over time.
Label Everything
A label maker applied to every bin, cabinet, and container eliminates the "where does this go?" question that causes systems to break down. Brother P-touch Label Maker — inexpensive, effective.
Maintain the System
Every storage system eventually degrades without maintenance. A 30-minute quarterly reset — everything back to its place, donate or discard accumulated clutter — keeps the garage functional long-term.
What Your Garage Climate Does to Stored Items
Most garages are unconditioned — meaning temperature and humidity swing freely with the weather. This affects what you can safely store and how you store it.
| Condition | Threshold | What It Damages | Prevention |
|---|---|---|---|
| High humidity | Above 60% RH | Rust on tools, mold on cardboard, paint can corrosion, mildew on fabric | Dehumidifier ($30–$50/year to run); sealed plastic bins instead of cardboard |
| Extreme heat | Above 100°F | Aerosol cans (explosion risk), adhesives, plastics warp, electronics | Never store aerosols in an unconditioned garage; keep electronics in climate-controlled space |
| Freeze-thaw cycles | Below 32°F | Latex paint (separates permanently), liquid cleaners, canned goods | Move freeze-sensitive items indoors for winter or insulate the garage |
| Temperature swings | 40°F+ daily swing | Condensation forms on metal surfaces — accelerates rust | Insulated garage door dramatically reduces swings |
Chemical storage: Paint, solvents, fertiliser, gasoline, and propane have specific storage requirements. Flammables should be in a ventilated steel cabinet or stored outside in a dedicated cage. Never store propane tanks (BBQ, torch) inside the garage — even a small leak plus a hot water heater pilot light is a serious fire risk.
Garage Storage Budget Guide
| Budget | System | Coverage |
|---|---|---|
| $200–$500 | Pegboard, basic hooks, 1–2 shelving units | One wall |
| $500–$1,500 | Slatwall panels, overhead rack, bike storage | Major walls + ceiling |
| $1,500–$4,000 | Full wall system + cabinets + overhead storage | Complete garage |
| $4,000–$8,000 | Premium cabinets + custom configuration + epoxy floor | Full fitted garage |
Ready to Organise Your Garage?
Upload a photo of your garage to the AI Garage Designer and get a personalised storage plan with specific product recommendations — matched to your space size and storage challenges.
Related guides: