
What Makes a Great Man Cave?
A great man cave is not just a room with a TV and a couch — it's a deliberately designed personal space where you can pursue your interests without compromise. The best man caves have a clear identity, good bones (structural, electrical, thermal), and enough thoughtful design to feel intentional rather than accidental.
Whether you're working with a garage, basement, spare room, or shed, the planning principles are the same: define the purpose, solve the structural problems first, then build the experience.
This guide walks you through every decision from floor plan to final pour at the bar.
In This Guide
Step 1: Define Your Man Cave Identity
The first question isn't "what furniture do I buy?" — it's "what is this space for?" The most successful man caves have a clear concept that drives every subsequent decision.
Common man cave identities:
| Concept | Core Elements | Budget Sweet Spot |
|---|---|---|
| Sports Bar | Large TV(s), bar, stools, team memorabilia | $5,000–$20,000 |
| Gaming Lounge | Multiple screens/projector, gaming chairs, RGB lighting | $3,000–$12,000 |
| Home Theatre | Large projector screen, reclining seating, sound system | $5,000–$25,000 |
| Billiards & Games Room | Pool table, dartboard, poker table | $4,000–$15,000 |
| Workshop/Hobby Room | Hybrid — work area with a bar or entertainment corner | $3,000–$10,000 |
| Vintage Bar | Classic bar design, spirits collection display, memorabilia | $4,000–$15,000 |
Commit to your concept before spending a dollar. Every off-concept purchase (the wrong type of seating, mismatched décor) is money that works against your vision.
Use the AI Garage Designer to get a personalised plan for your specific space based on your exact concept and budget.
Step 2: Solve the Structural Problems First
Whatever your concept, the physical space needs to be right before you furnish it. Skipping this step means spending good money on good furniture that sits in a cold, loud, dim, or damp room.
Insulation
An uninsulated garage is unusable for half the year in most climates — too hot in summer, too cold in winter. Insulating before you finish is essential.
Priority order:
- Garage door — biggest thermal weakness. Retrofit insulation kits are inexpensive and effective. Or, if the door is old, a new insulated door pays back quickly.
- Exterior walls — fiberglass batts between studs before drywalling
- Ceiling/roof — insulate above if you're using the space year-round
Soundproofing
A man cave with bass-heavy audio systems needs some soundproofing consideration — for your neighbours and for the people living in the house above/adjacent.
Practical options:
- Mass-loaded vinyl (MLV) behind drywall on shared walls
- Resilient channels between studs and drywall to break the sound path
- Acoustic panels on walls (also improve room acoustics for home theatre)
- Solid-core interior door (not hollow — hollow doors are acoustically useless)
What the Ratings Mean
| Treatment | STC Rating | What You'll Hear Next Door |
|---|---|---|
| Standard single drywall | STC 33 | Normal conversation clearly audible |
| Drywall + insulated cavity | STC 39 | Loud speech audible but muffled |
| + Resilient channels | STC 45 | Loud speech barely audible; music reduced to background |
| + Mass-loaded vinyl (both sides) | STC 55+ | Only heavy bass audible; near-silent for speech and TV |
For most man caves, STC 45 on the shared wall (drywall + insulation + resilient channels) is the practical target — it handles TV, music at moderate volume, and conversation. Full MLV treatment (STC 55+) is worth it only if you're running a subwoofer or home theatre at reference levels.
Full soundproofing is expensive. Focus on the shared wall(s) and the door.
Electrical
A man cave is a power-hungry space. Plan your electrical needs before the walls close:
- Dedicated 20A circuit for the AV rack or gaming setup
- Dedicated circuit for the mini-fridge or bar refrigerator
- Multiple outlets along each wall — you'll use all of them
- In-wall cable management rough-in for TV and speaker wires
For any new circuit work, hire a licensed electrician. It's code-required and the cost is modest relative to the project.
Step 3: Flooring for the Man Cave
The floor is foundational to the feel of the space. The right floor makes the room; the wrong floor undermines everything above it.
Epoxy Flooring
For garages-turned-man-caves, epoxy is the practical choice. It's durable, looks excellent with decorative flake finishes, and is easy to clean. The decorative flake options can actually look quite sophisticated — not just utilitarian.
See the full epoxy flooring guide in our Garage Makeover article
Interlocking Rubber or PVC Tiles
A quicker option that looks good and is comfortable underfoot. Popular for gaming rooms and workout areas within man caves.
Area Rugs
Layer an area rug over treated concrete or epoxy to define seating zones and add warmth and sound absorption. A large rug under the main seating area is one of the highest-value visual upgrades per dollar in any man cave.
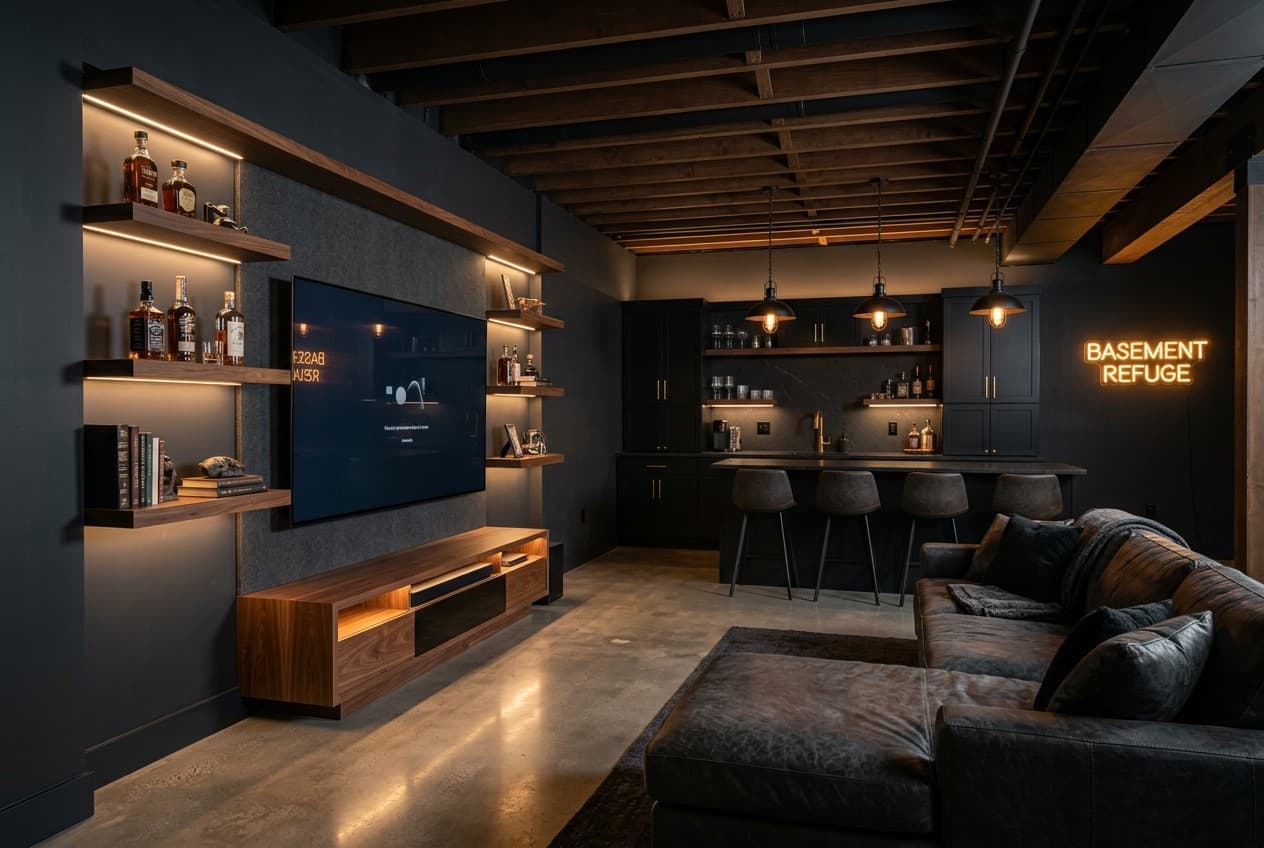
Step 4: The Bar Setup
A bar is the most common centrepiece feature of man caves, and for good reason — it anchors the space, provides a focal point, and enables the primary social activity.
Planning the Bar
Behind the bar, you'll need:
- A sink (requires plumbing — plan for this during rough-in if possible)
- Refrigerator or beverage centre (dedicated circuit)
- Ice maker or access to ice
- Storage for glasses and bottles
- Work surface for mixing
If plumbing is impractical: A dry bar works surprisingly well. A quality bar cart or bottle display with a small refrigerator eliminates the need for plumbing and can look intentional rather than compromised.
Bar Dimensions
| Element | Ideal Measurement |
|---|---|
| Bar top height | 42–43 inches (standard bar height) |
| Bar stool seat height | 28–30 inches |
| Bar depth (top) | 16–20 inches |
| Overhead clearance | 36 inches minimum above bar top |

Bar Stool Selection
Choose stools that match your bar top height: 28–30 inch seat height for a 42-inch bar, 24–26 inch seat height for a 36-inch counter.
Tolix-style bar stools — versatile, durable, available in every finish
For more bar ideas and specific builds, see DIY Bar Table Ideas and Basement Bar Ideas.
Step 5: Entertainment Systems
This section is where most man cave budgets flex most dramatically. The core principle: room acoustics and display size matter more than raw spec numbers.
TV vs. Projector
Large-screen TV (75"–100"):
- Pros: Bright image, works in any lighting, no maintenance, plug-and-play
- Cons: Expensive above 85", fixed size
- Cost: $700–$5,000 depending on size and brand
Projector + Screen:
- Pros: Massive image (100"+), immersive home theatre feel, cost-competitive at large sizes
- Cons: Requires controlled lighting (works best in dark rooms), lamp maintenance
- Cost: $500–$5,000 for projector, plus $200–$1,500 for a quality screen
For sports viewing where lights may be on, a large TV wins. For movie nights in a blacked-out room, a projector delivers the experience.
Screen Size and Viewing Distance
Use this to determine what size screen fits your room — or what room depth you need for the screen you want:
| Screen Size | Type | Ideal Viewing Distance (THX) | Min Room Depth |
|---|---|---|---|
| 65" | TV | 6.5–8 ft | 10 ft |
| 75" | TV | 7.5–9.5 ft | 11 ft |
| 85" | TV | 8.5–10.5 ft | 12 ft |
| 100" | Projector | 10–12.5 ft | 14 ft |
| 120" | Projector | 12–15 ft | 17 ft |
The formula: THX recommends a viewing distance of 1.2–1.6× the screen's diagonal measurement. Sitting closer is more immersive (cinema-like); further is more comfortable for long sessions. Room depth must exceed viewing distance by at least 2–3 ft for the seating itself.
Sound System Options
| Setup | Cost | Best For |
|---|---|---|
| Soundbar + sub | $200–$800 | Clean, simple, good enough |
| 5.1 surround | $500–$3,000 | Full movie experience |
| 7.1.2 Dolby Atmos | $1,500–$10,000+ | Serious home theatre |
For a garage man cave, in-ceiling speakers combined with a soundbar for dialogue and a subwoofer for bass gives excellent results without complex wiring.
Gaming Setup
If gaming is a primary activity, consider:
- A separate gaming monitor (27–32 inch, high refresh rate) for competitive gaming, distinct from the main TV used for console gaming
- A comfortable gaming chair — not just an office chair relabelled
- Lighting behind the TV (bias lighting) reduces eye strain during long sessions
Gaming Room Ideas Guide has complete recommendations for gaming-focused setups.
Step 6: Seating — The Most Used Investment
Seating is where you'll spend every minute in your man cave. Don't cut corners here.
Configuration options:
Sectional sofa: Maximum seating efficiency for the space. Look for a U-shape or L-shape configuration that wraps the viewing area. Leather or faux-leather is easier to clean than fabric.
Reclining home theatre seating: The gold standard for cinema setups. Power recliners in 2-, 3-, or 4-seat configurations with cup holders, USB charging, and LED backlights are widely available.
Bar stool zone + low seating zone: Popular for sports bar concepts — bar seating for watching games, lower lounge seating for longer evening hangouts.
Key shopping advice: Buy seating you can actually test first if possible. Seating comfort is subjective and important enough to visit a showroom.
Step 7: Lighting Design
Lighting in a man cave should serve multiple moods and functions.
Layer Your Lighting
Ambient lighting: General ceiling fixtures for basic illumination when you need to see the whole room. Recessed LED downlights are clean and controllable.
Task lighting: At the bar — pendant lights overhead. Under bar cabinet lighting for ambience. Over the pool table if you have one (dedicated pendant or pool table light).
Accent/mood lighting: This is what transforms a room. LED strip lighting behind the TV (bias lighting), under the bar top, along shelving, and around architectural features creates the "cave" atmosphere.
Dimmable everything: Every fixture in a man cave should be on a dimmer. Nothing kills the mood faster than industrial-bright overhead lights during a movie. Smart bulbs (Philips Hue or similar) enable scene control from your phone — pair them with a home control hub to manage lighting, climate, and entertainment from one place.
LED Strip Lights — 32.8ft Color Changing — popular choice for accent lighting
Step 8: Man Cave Décor and Personalisation
Décor is where your man cave becomes yours — not just any well-equipped room.
Theme-Consistent Décor
Sports theme: Team colours in accent walls or upholstery, framed jerseys, vintage pennants, game-used memorabilia. Don't go overboard — pick 2–3 hero pieces.
Vintage bar theme: Neon signs, exposed brick or faux-brick panels, whisky barrel furniture, vintage sports or beer posters.
Industrial/modern: Exposed concrete, steel shelving, Edison bulbs, clean lines. Suits garages particularly well since the bones of the space already carry industrial character.
Gaming/tech theme: RGB lighting as design element, monitor wall displays, brand merchandise tastefully placed.
The Neon Sign Rule
One or two neon signs (real glass or LED neon flex) are an excellent focal point. Three or more starts to look like a junk shop. Choose signs that reinforce your theme, not just generic phrases.
Man Cave Budget Planning
| Budget | What You Get | Estimated Cost |
|---|---|---|
| $3,000–$5,000 | Good TV, comfortable seating, bar cart, basic décor | Entry-level |
| $5,000–$10,000 | Large TV + sound system, proper bar, quality seating, lighting design | Mid-range |
| $10,000–$20,000 | Full AV system, wet bar, custom seating arrangement, insulation, full décor | Premium |
| $20,000+ | Home theatre setup, full bar with plumbing, custom millwork, HVAC | Luxury |
For budget-conscious builds, see Budget Man Cave Ideas for specific approaches under $3,000.
Ready to Plan Your Man Cave?
Upload a photo of your space and let the AI Garage Designer build you a personalised man cave plan — specific to your space size, primary use, and budget.
Related guides: